RailMap.net
Electronic maps
User Guide
version 0.1
CONTENTS
3.1.6.2.1 “Positions history” form
3.1.6.2.2 “Historical positions” form
3.1.6.3.1 “Tracked objects list” form
3.1.6.3.2 “Import positions from XML” form
3.1.6.3.3 “Tracked object detail” form
3.1.6.3.4 “Tracking requirement” form
3.2.2.1 Select and enter station
4 Detailed description of modules
4.5.3.4 Import positions from XML
1
Introduction
The RailMap.net
Electronic Map is a client-server web application. Its main purpose is to
provide information about railway infrastructure in graphic form. It contains
many useful functions, for example tracking of objects (wagons, containers,
cars, etc.) on the map. It also shows names of towns and cities, depending upon
the currently selected map scale.
The
application itself is divided into seven modules (Home, Map, Locations, Stations,
Tracking, Infrastructure and Corridors). The application menu is structured
accordingly.
2
Basic
Operations
2.1 Start and Login
To start the application you need to have a web browser (Microsoft
Internet Explorer or Mozilla Firefox) installed. Javascript has to be allowed
in the browser. You can work with the application in two modes: in the DEMO
mode you have access to the electronic map with Google data and in the
REGISTRATION mode you have full access to the RailMap.net application using
your login and password. But first you have to register, sign a contract and
pay an advance.
First you see a login form (in the DEMO mode). Here you enter your login
and password. When entering your password be careful to correctly type in the
upper and lower case letters ("Password123" and "password123"
makes difference). You have to enter both your login and your password,
otherwise you will get an error message – “Login not entered!” or “Password not
entered”.
If the entered login does not exist or if you enter an incorrect
password, you will see the following error message: “Incorrect login or
password!”.
If you login correctly, you will see the main form.
2.2 Quit and Automatic logout
You can quit the application by clicking on the Logout button and by closing the web browser page. To logout it is NOT enough to just close
the browser page! The application also has a set idle time, in which you
will be automatically logged out, if you do not use the application. The
current idle time is 20 minutes.
2.3 Help
The Help function is available in all application forms. You can open it
by clicking on the
![]() icon found in the right upper corner of the
form, next to user identification data.
icon found in the right upper corner of the
form, next to user identification data.
3
Application Description
In the DEMO mode, before logging in you will see a default form, which
is divided into three main parts.
The first (upper) part contains the company and application logo, flag
buttons to change languages and login items (“User” and “Password” text fields,
Login button). The default language
is English.
In the upper part of the form you can also find a menu containing seven
pages, which allow you to access the corresponding modules. The pages are: Home, Map, Locations,
Stations, Tracking, Infrastructure and Corridors (in the DEMO mode only the Home page
is accessible).
In the
left part of the form you can see an interactive Google map, as well as all
electronic map controls.
In the upper left part of the map
there is a control, which allows you to change the map scale and position. You
can change the map scale by clicking either on the plus or on the minus button.
You can move the map by clicking on one of the four arrow buttons; you always
move the map in opposite direction that the one represented by the arrow
button. The current map scale is also shown in the upper left part. Another
electronic map control is a form containing buttons that can be used for
changing the map type (Basic, Satellite, Earth, Hybrid).
The
upper part contains a form, which is individual to each module and includes
pages corresponding with application functions. These functions allow you to
efficiently and quickly display the map on basis of the searched coordinates,
which are highlighted by markers. This form can be either hidden or shown.
After login (REGISTRATION mode) you will see the application main form containing
an interactive blind JERID map. The form containing buttons changes according
to user settings. Now you have the possibility to display layers of Railways,
Stations, Markers and Infrastructure. In the lower right corner of the map
there is an Overview form, which shows the map in a larger scale and a
highlighted cut of the currently displayed map area. By moving the cut you move
the map as well. The Overview form can also be hidden.
According to the user rights you can further see the pages used for
module selection, the name of the currently logged in user and the Logout button (in place of the Login button). Otherwise, this form is more
or less similar to the main form.
3.1 Menu
3.1.1 General
The menu structure corresponds with the application division into
modules. It therefore contains the following seven items: Home, Map, Locations,
Stations, Tracking,
Infrastructure and Corridors.
The contents of the form located in the upper part and the pages will change in
dependence on the selected item.

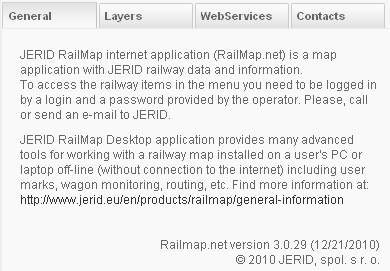
3.1.2 “Home”
The “Home” module displays basic information about the application. It
contains following pages: “General”, “Layers”, “WebServices” and “Contacts”.
3.1.3
“Map”
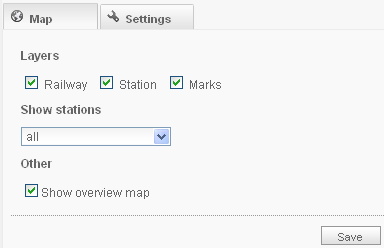
The “Map” module allows you to define individual settings for displaying
selected graphic information and for using selected map functions. It contains
two pages: “Map” and “Settings”.
3.1.3.1 “Map” Page
The “Map” page contains following items:
- Layers – there
are three check boxes that allow you
to select (switch on/off) which layers will be displayed on the map. These
three layers are:
- Railway – it is only
displayed at a particular scale, i.e. each railway belongs to a category
and categories are displayed according to the selected scale.
- Station – stations
are also displayed at a particular scale, see the “Station” item in the “Settings”
page.
- Markers – the
currently displayed map area shows markers saved by the currently logged
in user, regardless of group. Each marker contains saved information
which will be displayed if you move the mouse cursor on the marker.
- Show stations
–here you can select which stations are to be displayed.
- Other –here
you can switch on/off the Overview form.
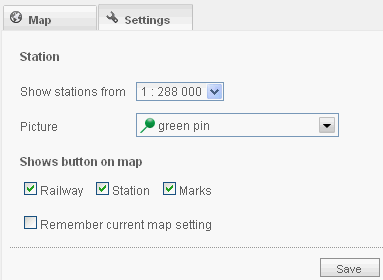
3.1.3.2 “Settings” Page
Here you can define the scale, from which the railway stations will be
displayed on the map. You can also select which “pin” will be used for marking
the stations. Furthermore, you can set which buttons will be displayed (Railway,
Station, Markers). And last, the page contains a check box: “Remember current
map setting”.
3.1.4
“Locations”
This module allows you to find and display a location on the electronic
map. The module has three pages: Find, Coordinates and Markers).
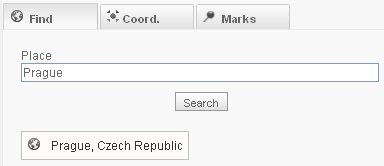
3.1.4.1 “Search”
This page contains the “Find” function which allows you to find a
location according to the entered text. There are following controls:
- Location – it
is a text field where you can enter the name of the searched location.
- Search – this
button activates the “Find” function.
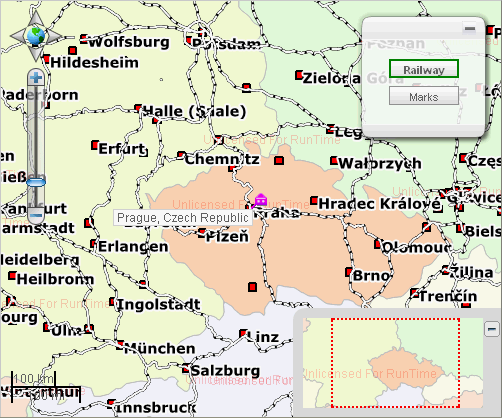
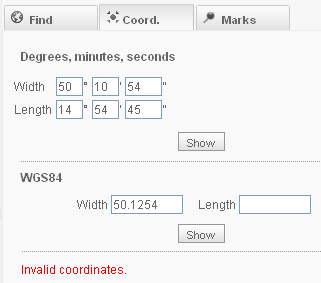
3.1.4.2 “Coordinates”
This page is used for finding and displaying places on the map on basis
of entered coordinates. It is possible to search the coordinates in two
coordinate systems (GPS and WGS84). The page contains following items:
- Width, Length
– these are text fields where you can enter the coordinates.
- Show – by
clicking on this button you activate the “Show according to coordinates”
function.
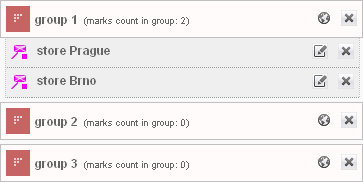
3.1.4.3 “Markers”
This page is used for working with markers. Markers are locations marked
on the map by the user. Each user can define their own markers. The markers are
saved in user-defined groups; therefore each marker has to be assigned to a
group.
There are following functions:
-
New group – using this function you create a new user
group.
-
New marker – using this function you create a new
marker belonging to a selected group.
-
Show markers – this function allows you to display all
markers belonging to a selected group or all markers of all groups.
-
Show marker – this allows you to display and centre the selected marker on the map.
-
Edit marker – here you can edit the selected marker.
-
Delete group – using this function you delete the
selected group including all its markers.
-
Delete marker – using this function you delete the
selected marker.
The page also contains following controls:
- Groups – a list containing all created groups with
their respective markers. The Group and Marker boxes contain graphic
buttons, which activate the above mentioned functions.
- Show all, New
marker, New group – these buttons activate
corresponding functions.
3.1.5 “Stations”
The “Stations” module is used
for finding and displaying a particular railway station or for displaying a
route between stations selected in a list. The module contains two pages:
Station and Route.
3.1.5.1
“Station”
Page
This page is used for finding
and displaying selected railway stations on the map. For this purpose the page
contains one derived control: “Select and enter station”.
3.1.5.2
“Route”
Page
The page contains a function
which displays a route (by a highlighted line) between stations entered in the
list. This page therefore contains following controls:
- Stations list – a table containing
stations list, “Number” and “Name” columns and “Delete” function.
- Show route – this button activates the
corresponding function.
3.1.6
“Tracking”
The “Tracking” module is used for displaying tracked
objects (wagons, trains, engines, etc.) in a graphic way. It contains functions
such as displaying current position or displaying objects movement history as
well as four pages: Positions, History, Objects and Settings.
3.1.6.1 “Positions” Page
This page contains the
“Search positions” and the “Show positions” functions, which are used for
finding and displaying current positions of selected objects. The page also
allows you to export positions into a XML and CSV file. It contains following
controls:
- For the last days – this is a text field where you can enter the
number of days determining the time period within which the object
positions are to be searched.
- Number of items on page – this is a combo box where you can select how many items will be displayed in the table.
- Automatic update – this is a check box which allows you to switch
on/off the automatic page update.
- Search – this button activates the “Search positions” function;
after clicking on this button you will see all known positions of all
objects within the selected time period.
- XML Export, CSV Export – these buttons enable you to export the
positions displayed in the list into the respective files.
- Positions – this is a table containing positions list where you can
mark items (all | none | reversely) and sort them according to Name and
Date and time.
- Sort – this is a combo box where you can select the way by which
positions will be sorted in the table.
- Show selected – this button activates the “Show positions” function.
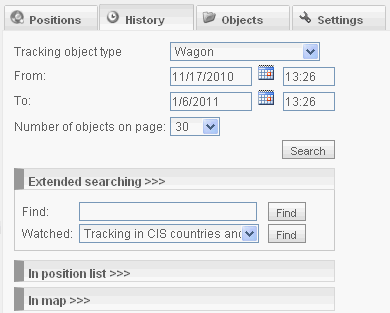
3.1.6.2 “History” Page
This page allows you to
display the history of object positions of the currently logged in user, i.e.
you can see the positions within a pre-selected time period. The positions are
marked on the map with markers.
The page contains two forms:
“Positions history” (it
is used for displaying searched objects) and “Historical positions” (it is used for displaying selected objects positions on the map).
3.1.6.2.1
“Positions history” form
The “Positions history” form contains following controls:
- Tracked object type – this is a combo box where you can select a
particular means of transport.
- From, To – here you enter date and time; you can also do that by
selecting a date from the calendar.
- Number of objects on page – this is a combo box where you can
select how many positions will be displayed in the table.
- Search – this button activates the “Update objects list” function;
after clicking on this button you will see a table containing all objects
that fulfil the selection criteria. At the same time the number of the
tracked object positions will be counted and displayed in the “Positions”
item.
- Extended search – it contains items that allow you to narrow down
the selection. These items are: the
“Find” text field (where you can enter the first letters of the searched
object name) and the “Tracked” combo box (where you can select the type of
the tracking mode).
- In positions list – it contains two check boxes: “Display name of
nearest station” and “Do not display duplicate positions”.
- In map – it contains four check boxes: “Name”, “Date”, “Time”,
“Nearest stations”; if you check them, the corresponding data will be
displayed on the map.
- Objects – this is a table showing objects and containing the
following columns: “Picture”, “Name”, “Number”, “Find”, “Display”, “Connect”
and “Azimuths”.
- Number of positions on page – this is a combo box where you can
select how many items will be displayed in the table.
- Search – this button activates the “Search and display positions”
function; after clicking on this button you will see the “Historical
positions” form.
3.1.6.2.2
“Historical positions” form
The “Historical
positions” form contains
following items:
·
Name
– this is a combo box where you can select a particular object, the positions
of which should be found.
·
Sort
– this is a combo box where you can select the way in which the positions will
be sorted in the table.
·
XML
Export, CSV Export – these buttons enable you to export the positions history
into the respective files.
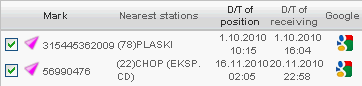
·
Positions
list – this is a table showing positions and containing following columns: “Nearest
station”, “Position date and time”, “Date and time of receiving” and “Detail”.
·
Back
– this button enables you to go back to the “Positions history” form.
3.1.6.3 “Objects” Page
This
page allows you to work with the tracked objects. Each object is identified by
its name (it usually is a wagon number), description, type of means of
transport and icon. This page also contains several forms: “Tracked
objects list”, “Import
positions from XML”, “Tracked
object detail” and “Tracking
requirement” (this form contains other below mentioned
forms).
3.1.6.3.1
“Tracked objects list” form
The
“Tracked objects list” form is used for displaying all
objects belonging to the currently logged in user. It contains following
controls:
·
Tracked
object type – this is a combo box where you can select a particular means of
transport.
·
Number
of objects on page – this is a combo box where you can select how many items
will be displayed in the table.
·
Find
– this is a text field where you can enter the first letters of the tracked
object name.
·
Search
– this button enables you to display all objects according to the text entered
in the “Find” item and the selected tracked object type.
·
Objects
list – this is a table showing found objects and containing following columns: “Picture”,
“Name”, “Description”, “Edit” and “Detail”.
·
Positions
import, New object – after clicking on these buttons, you will see the “Import
positions from XML” form and the “Tracked object detail” form respectively.
3.1.6.3.2 “Import positions from XML” form
The
“Positions import from XML” form contains following controls:
·
Browse
– after clicking on this button, you will see the “Load file” dialogue form
where you can select an XML file.
·
Import
– by clicking on this button, you will start the import of objects positions
from the selected XML file.
·
Back
– this button enables you to go back to the “Tracked objects list” form.
·
Example
of XML positions file and XML file scheme – these links allow you to display
examples of XML files.
3.1.6.3.3
“Tracked object detail” form
The
“Tracked object detail” form is used for creating a new
object and editing an existing one. It contains following controls:
·
Name
– it is a text field where you can enter the name of a new object.
·
Description
– it is a text field where you can enter additional information concerning the
object.
·
Tracked
object type – this is a combo box where you can select a particular means of
transport.
·
Picture
– this is a combo box where you can select graphic elements – icons.
·
Use
azimuths – it is a check box which allows you to select (switch on/off) whether
“Azimuths” are displayed in the “Objects” table on the “History” page.
·
Save
– after you click on this button, the name (of wagon or container) will be
checked and the new or edited object will be saved.
·
Back
– this button enables you to go back to the “Tracked objects list” form.
·
Delete
– using this button you can delete the selected object. This button is
accessible only in the edit mode.
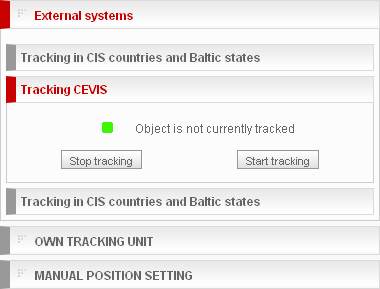
3.1.6.3.4 “Tracking requirement” form
The
“Tracking requirement” form can be opened by clicking on
the object in the “Name” column in the “Objects list” table and it is used for selecting
the mode of tracking. It contains following controls:
·
Name,
Tracked object type
·
Last
position – it shows information about the date and time of the position, about
the nearest station (including railway) and links to a position on JERID blind
map and on Google map.
·
Groups
– this tree view contains following items: “External systems” (Tracking with UZ,
CEVIS Tracking), “Own tracking units” (Tracking with Racapoun SMS) and “Manual
position setting”. These items contain following controls:
o
Tracking
with UZ
§
Currently
tracked – it shows the state of tracking.
§
Stop
tracking – if you click on this button, tracking of the selected wagon will be
stopped.
§
Start
tracking – if you click on this button, a form will be opened where you can
enter the Dispatch and Destination station.
§
Get
current position – by clicking on this button you can display the current
position of the selected wagon.
o
CEVIS
Tracking
§
Currently
tracked – it shows the state of tracking.
§
Stop
tracking – if you click on this button, tracking of the selected wagon will be
stopped.
§
Start
tracking – if you click on this button, tracking of the selected wagon will be
started.
o
Tracking
with Racapoun SMS
§
Currently
tracked – it shows the state of tracking.
§
Code
– this is a text field where you can enter code.
§
Stop
tracking – if you click on this button, tracking of the selected wagon will be
stopped.
§
Start
tracking – if you click on this button, tracking of the selected wagon will be
started.
§
Tracking
detail – if you click on this button, the “Tracking with Racapoun SMS” form
will be opened.
o
Manual
position setting
§
Manual
position setting – if you click on this button, the “Manual position setting”
form will be opened. The form contains controls and items which allow you to enter
date and time, information (description) and GPS or WGS84 coordinates.
·
Back
– this button enables you to go back to the “Tracked objects list” form.
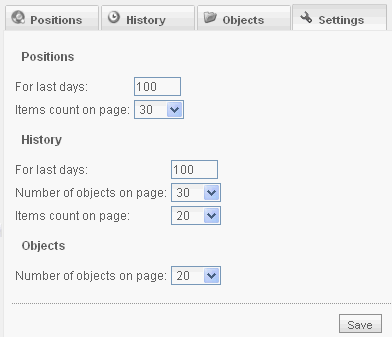
3.1.6.4 “Settings” Page
The “Settings” page allows you to define the time
period of tracking, the number of items and objects that will be searched or
displayed on the “Positions”, “History” and “Objects” pages. You can save the
settings by clicking on the “Save” button.
3.1.7 “Infrastructure”
The “Infrastructure” module is used for displaying
infrastructure on basis of defined parameters. It also provides information
about track parameters based on the National Network Statement (e.g. track
owner, track gauge, track leg length, traction type, traction system, number of
rails, etc.). The module contains three pages: Show, Route and Info.
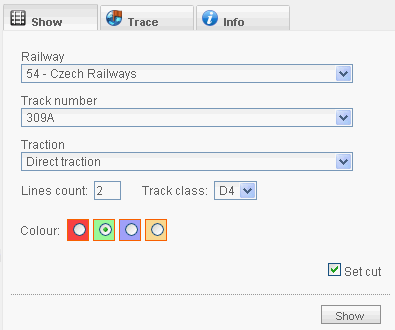
3.1.7.1 “Show” Page
This page is used for
displaying infrastructure according to selected parameters. It contains
following controls:
- Railway – this is a combo box where you can select a railway.
- Track number – this is a text field where you can enter track
number.
- Traction – this is a combo box where you can select a traction
type.
- Number of rails – this is a text field where you can enter the
number of rails.
- Track class – this is a combo box where you can select a track
class.
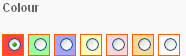
- Colour – these radio buttons
represent different colours used for highlighting connecting lines.
- Set cut – by checking/unchecking this check box, you select whether
the map cut should be set so as all connecting lines are visible.
Otherwise, the current map cut will be shown.
- Show – this button activates the “Show infrastructure” function.
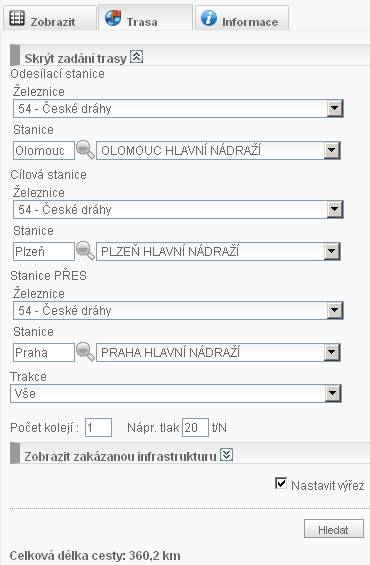
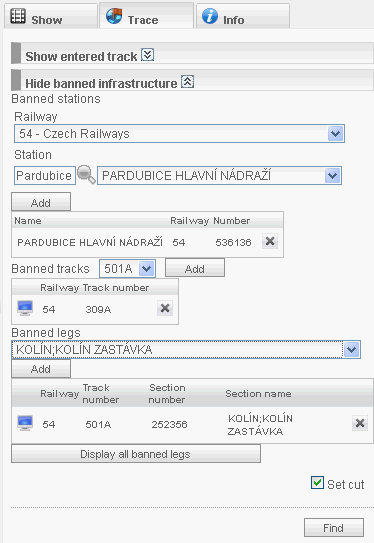
3.1.7.2 “Route” Page
This page enables you to
find the shortest route between two stations (dispatch and destination station)
with the possibility to find a route going via another selected station. You
can also select parameters for the route; these parameters are: Traction,
Number of rails, Axle load and Ferries allowed. Furthermore you can restrict
the selected route by means of “forbidden” infrastructure, which consists of stations,
tracks or track legs that cannot be included in the shortest route.
The page contains:
- Route selection – it contains following items for defining a route:
- Dispatch station, Destination station and Station via – these are
derived items of the “Select and enter station” function, which allow you
to select stations.
- Traction – this is a combo box where you can select between “All”
and “Electric only”.
- Number of rails – this is a text field.
- Axle load – this is a text field where you can enter decimal
number.
- Ferries allowed – this is a check box, which allows you to select
whether ferries can or cannot be included in the shortest route.
- Forbidden infrastructure – it contains following controls for
entering route restrictions:
- Forbidden stations – this is a derived item of the “Select and
enter station” function, which allows you to select stations.
- Add – by clicking on this button you add selected stations to the
“Forbidden stations” list.
- Stations list – it is a table containing three columns (“Name”,
“Railway”, “Number”) and a “Remove” icon.
- Forbidden tracks – this is a combo box where you can select a
track, which is part of the selected railway infrastructure.
- Add – by clicking on this button you add selected tracks to the
“Forbidden tracks” list.
- Tracks list – it is a table containing two columns ( “Railway”, “Track
number”) and a “Show” and “Remove” icon.
- Forbidden legs – this is a combo box where you can select a leg
(dispatch – destination station), which is part of the selected railway
track infrastructure.
- Add – by clicking on this button you add the selected track legs
to the “Forbidden legs” list.
- Legs list – it is a table containing four columns ( “Railway”, “Track
number”, “Leg number”, “Leg name”) a “Show” and “Remove” icon.
- Show all forbidden legs – if you click on this button, all tracks
and legs will be displayed on the map.
- Set cut – by checking/unchecking this check box, you select whether
the map cut will be displayed or not. The function is the same as the one
on the “Show” page.
- Search – this button activates the “Find shortest route” function.
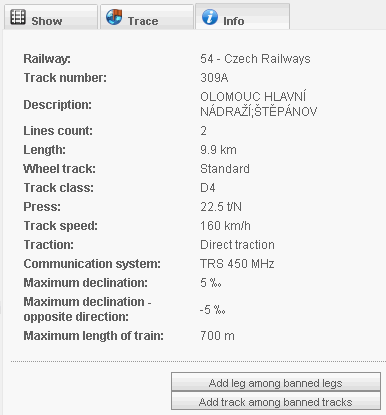
3.1.7.3 “Info” Page
This page displays detailed information about the track leg, which is currently selected on the map. It
contains parameters associated with the given national railway network. These
parameters usually are: Railway, Track number, Description, Number of rails,
Length, Track gauge, Track class, Axle load, Track speed, Traction, Profile, Line
safety system, Communication system, Maximum ascent and Maximum train length.
Ferries have these parameters: Ferry number, Description and Length. Moreover,
the page contains two buttons: Add leg
among forbidden legs and Add track
among forbidden tracks. The legs or
tracks are added to the “Route” page.
3.1.8 “Corridors”
This module is used for displaying corridors. This is done by
clicking on the “Show corridor” button. The railway legs belonging to the
selected corridor are shown on the map in the selected colour.
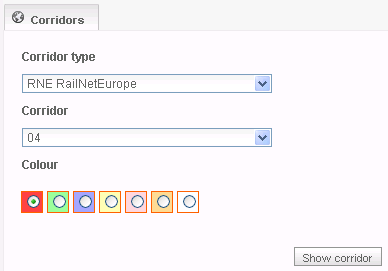
3.1.8.1 “Corridors” Page
The “Corridors” page
contains following items:
·
Corridor type – this is a
combo box where you can select a corridor type.
·
Corridor – this is a combo
box where you can select a corridor belonging to the previously selected corridor
type.
·
Colour – these radio buttons
represent different colours used for highlighting corridors.
·
Show corridor – this button
activates the “Show corridor” function.
3.2 Controls and items
Each
application page contains following controls and items for entering or
displaying data:

3.2.1 Basic controls
3.2.1.1 Text field
By means
of the keyboard you can type in and edit texts, numbers or dates in the text
box. This is done in the usual way, using the Insert, Delete, Home, End keys, etc., as well. There are several types of text boxes: one
for characters and numbers, one for number values and one for dates.
![]()
3.2.1.2 Combo box
A combo box contains several
options, from which you can choose only one. The combo box is displayed by
clicking on the header ![]() . You
can select an option by clicking on it or by using the cursor keys and the Enter key.
. You
can select an option by clicking on it or by using the cursor keys and the Enter key.
![]()
![]()
3.2.1.3 Check box
Check
box is a simple item that can have two states: On ![]() or Off
or Off ![]() . You
can check or uncheck the check box by clicking on it or by pressing the space
key.
. You
can check or uncheck the check box by clicking on it or by pressing the space
key.
![]()
3.2.1.4 Button
Buttons
are used for activating functions. This is done by clicking on them. The
graphic aspect of buttons may vary.
![]()
![]()
![]()
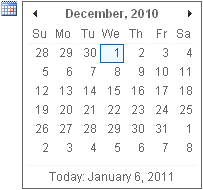
3.2.1.5 Calendar
This control allows you to select and enter a
date into a text field.
3.2.1.6 Table and List
Both of these controls look the same, i.e. they consist of a header and
a list of items. But in a table it is possible to put the items in order
according to the selected column.
a) table
b) list
3.2.1.7 Tree views
There are two types of tree views used in the application. One type of
the tree view allows you to display or hide a part of the list by clicking on
the list header. The example used here shows the displayed/hidden items
contained in user-defined groups.
The other type differs from the first one in the way a part of the list
is hidden: this is done by “opening” (i.e. clicking on) another part of the
list.
3.2.1.8 Radio buttons
This control allows you to choose one of several options.
3.2.1.9 State of tracking
This graphic element is used for highlighting the current state of a
tracked object. It shows whether an object is or is not currently tracked.
![]()
![]()
3.2.2 Derived elements
Derived
elements consist of several basic elements and are used for selecting and
entering more complicated data structures.
3.2.2.1 Select and enter
station
This
derived element is used for selecting and entering stations in a form.
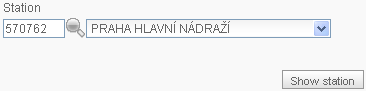
The
procedure of station entering and selection is following:
Into the text field you enter the number or name of the searched station
or the first letters of the station name and you press the Enter key or click on the ![]() button. If there are more stations beginning
with the entered number or name, you will see a combo box, from which you can
select the searched station. Then you click on the Show station button to confirm your selection.
button. If there are more stations beginning
with the entered number or name, you will see a combo box, from which you can
select the searched station. Then you click on the Show station button to confirm your selection.
4
Detailed
description of modules
4.1
Home
You can display the pages by clicking on the
headers.
4.2
Map
4.2.1
Map
You select which layer and stations will be displayed on the map by
simply checking the corresponding check boxes and selecting the corresponding
option from the “Show stations” combo box. You can save the setting by clicking
on the Save button.
Show Railway layer – railways
are displayed only at particular scales. Each line segment of the railway layer
has its own category (1-5) and at certain scales only certain categories are
displayed. At a scale, at which the whole of
Show Station layer – stations
are also displayed up from a particular scale. This scale can be defined on the
“Settings” page. Stations are divided into two categories and only certain
stations are displayed at a certain scale. Stations of category 1 (stations
with a grade 3 and more) are displayed from a scale of 1: 280 000, other
stations (with a grade less than three) are displayed from a scale of 1:72 000.
Show Markers layer – if
the “Markers” check box is checked, all saved markers belonging to the
currently logged in user (regardless of groups) will be displayed in the
currently displayed map area. According to the settings also the name and
description of the marker can be displayed.
4.2.2
Settings
On this page you can set which buttons and railway station icons will be
displayed. You can save the settings by clicking on the Save button.
4.3
Locations
4.3.1
Find

First, you have to enter the name or
part of the name of the location you want to find, and then you can click on Search button. If you click on the Search button without entering anything
into the “Location” item, you will see the same form, only with a notification
saying “No items...”. If you enter a name, and you can still see the
notification, it is because no relevant station was found in the database. Before
you click on the Search button, it
is advisable to check the entered text one more time.
If the search is successful, you will see a list of relevant stations
below the Search button. If you
click on the selected item, the station will be displayed on the map with a
little icon marking its location. If you move the mouse cursor to the location,
you will see a description of the selected station.
4.3.2
Coordinates
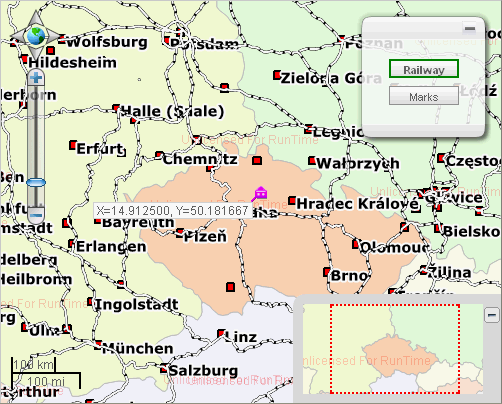
Another way of finding a location on the map is to enter its coordinates
in either of the coordinate systems (GPS or WGS84). Into the respective text
fields you enter the searched coordinates and then you click on the Show button. The searched location will
then be displayed on the map. If you enter wrong, non-existing coordinates, you
will see a notification saying “Invalid coordinates” and no location will be
displayed.
If you enter correct coordinates and click on
the Show button, the searched
location will be displayed on the map with a little icon marking its position. If you
move the mouse cursor to the location, you will see its coordinates.
4.3.3
Markers
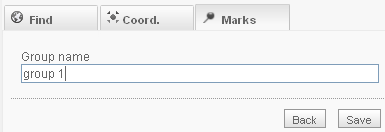
Each marker must be assigned to a user group,
which means that first you have to create a group. To do this you click on the New group button and enter a group name
into the displayed form. Then you click on the Save button. If you do not enter any name of the group, then, after
clicking on the Save button you will
see a notification saying “Group name is not entered” and the group will not be
saved.
After you create the “first” group, the New marker button will be available. By
clicking on this button you can create a new marker. You fill in the mandatory
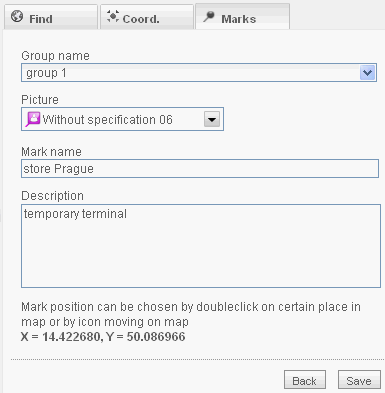
items, which are: “Group name”, “Picture”, “Marker name”. You position the
marker on the map by double clicking on the selected location. Until you save
the created marker, you can change its location by dragging it with the mouse
anywhere else.
You can use all available functions for working
with the markers:
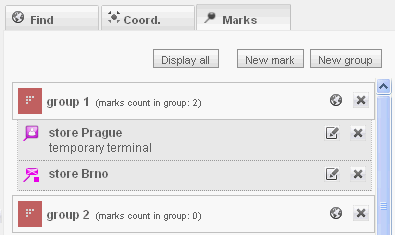
Centre marker – you
can do this by clicking on the selected marker in the markers list.
Display markers – you
can display all markers in a group in close-up, if you click on the ![]() button, which is located by the Group name.
You can also display all markers of all groups by clicking on the Show all button. The map area will
always be displayed so as to contain all relevant markers.
button, which is located by the Group name.
You can also display all markers of all groups by clicking on the Show all button. The map area will
always be displayed so as to contain all relevant markers.
Edit marker – if
you click on the ![]() button, you can edit the selected marker. The
form is the same as the one used when creating a new marker.
button, you can edit the selected marker. The
form is the same as the one used when creating a new marker.
Delete group, marker – you can remove a group or a marker by clicking on the ![]() button, which is located at each marker as
well as each group.
button, which is located at each marker as
well as each group.
4.4 Stations
4.4.1
Station
If you want to find a station, you first have
to select a national railway (“Railway” item) and use the “Select and enter
station” derived control (i.e. enter the station name or its beginning into the
“Station” item, click on the Search button and select the station from a combo
box).
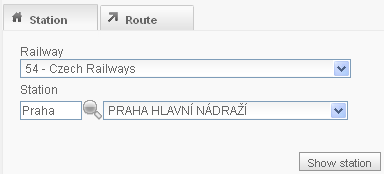
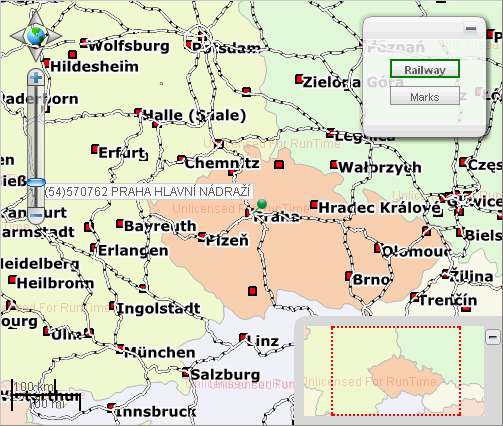
Then, if you click on the Show station button, the selected station will be displayed on the
map. If you move the mouse cursor over the station marker, you will see a
window containing the railway number and the station number and name.
4.4.2
Route
The application allows you to display a route
between two and more stations. First, you have to select a station (using the
“Select and enter station” control) and add it to the stations list. This is
done by clicking on the Add station button.
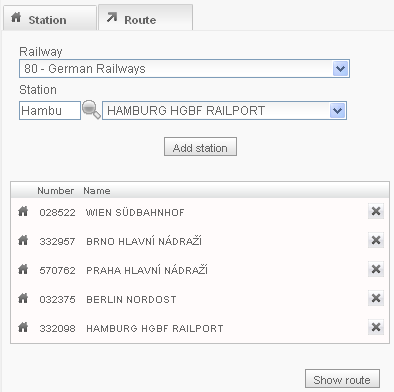
If you have selected all stations that should
be comprised in the route, you can display the route by clicking on the Show route button.
4.5
Tracking
4.5.1
Positions
You can display the current positions of
tracked objects in a table and on the map by clicking on the Search button. All found positions will
be then shown on the map. Before you launch the search, you can set some of its
parameters, thus restricting the extent of the search. This is done by entering
any data into following items: “For the last page”, “Number of items on page”
(according to the number set on the “Settings” page). If no objects are found,
you will see a notification saying “No data items...”. By checking or
unchecking the “Automatic update” you can set whether the page will or will not
be updated every 60 sec.
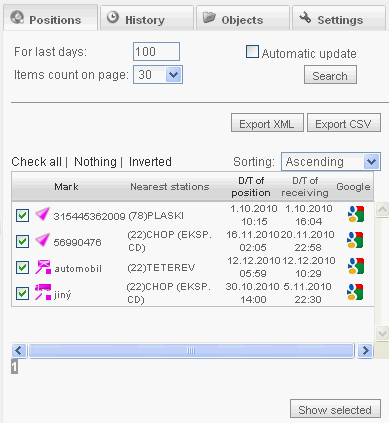
You can further work with the current positions
of objects. You can sort the items in the table according to columns: “Name”
and “Position D/T” (Date and Time). To sort the items you click on the header
of the selected column and the items will be sorted in order selected in the
“In order” combo box.
You can also choose which positions will be
displayed on the map. You only have to check the ![]() check box by the selected positions and click
on the Show selected button (the
default setting is that the check box is checked; you can also make use of the
“all | none | reversely” function). The selected items will be displayed on the
map and the displayed map area will be large enough to comprise all positions.
By clicking on a position on the map you will centre it.
check box by the selected positions and click
on the Show selected button (the
default setting is that the check box is checked; you can also make use of the
“all | none | reversely” function). The selected items will be displayed on the
map and the displayed map area will be large enough to comprise all positions.
By clicking on a position on the map you will centre it.
By moving the mouse cursor
over the position on the map you can display detailed information on the
position. You can also display the positions on Google maps (this is done by
clicking on the ![]() button in the table or on the map).
button in the table or on the map).
Moreover, you can export the positions list
into a XML or CSV file by simply clicking on the XML Export or CSV Export buttons.
4.5.2
History
If you want to see the positions of objects
belonging to the currently logged in user, you have to do it in two steps:
4.5.2.1 Positions history
First, you click on the Search button. You will see a table containing a list of objects. If
no objects are found, you will see a notification saying “No data items...”. Before
you launch the search, you can set some of its parameters, thus restricting the
extent of the search. This is done by entering any data into the following
items: “Tracked object type”, “From”, “To”. The “Tracked object type” combo box
contains several options: Wagon, Container, Engine, Truck, Car, Other. The
“Number of objects on page” combo box allows you to selectt how many objects
will be displayed in the table. More objects will be displayed on following
pages.
The form also contains the “Extended search” tree
view, which allows you to restrict the search by entering the searched object
name (the “Find” text field) or by selecting the tracking method (the “Tracked”
combo box). Both of these functions are activated by clicking on the respective
Search buttons.
In the second step you set and display the
historical positions of objects on the map. The setting is done in the
“Objects” table by means of check boxes and it is done for each object
separately.
If you check the “Show history” check box, you
will see the positions history of the selected object in a new table –
“Positions history”. If you check the “Show” check box, you will see the
positions markers on the map. And if, at the same time, you have checked the “Connect”
check box, the markers will be connected by lines. The Connect function is
available only if you have the “Show” check box checked. And last, there is the
“Azimuths” check box, which allows you to display azimuth icons instead of the
object icons on the map. But this function is also available only if you have
the “Show” check box checked. If you check the “Use azimuths” check box in the
“Tracked object detail” form, the “Azimuths” check box in the table will be
checked automatically.
The “History” page also contains two tree views
(“In positions list”, “In map”), which allow you to select what information
will be displayed for the tracked objects in the table or on the map. Both
lists therefore contain appropriate check boxes.
If you then click on the Show button, the markers will be displayed on the map. As in the
previous forms, in this form it is also possible to select how many items will
be displayed on one page. You can do this by selecting the appropriate number
in the “Number of objects on page” combo box. The option shown in the combo box
can be pre-set on the “Settings” page.

4.5.2.2 Historical positions
If you have checked the “Show history” check
box, then, after you click on the Show button,
you will see a new form: “Historical positions”. This form contains two combo
boxes, two buttons and a table. If you have selected more objects in the
previous form, then there is the “Name” combo box, in which you can select the
object the positions of which you want to display in the table. The “In order”
combo box allows you to select the way in which the “Position D/T” (Date and
Time) column will be sorted in the table. The two buttons (XML Export, CSV Export) allow you to export the positions
shown in the table into the selected files. The table contains a list of
particular positions. This table has only one element that can be sorted – the
“Position D/T” column. To put the column in the selected order you simply have
to click on the column header.
By moving the mouse cursor over the position in
the table you can display detailed information on the position. Just like in
all other tables in the “Tracking” module, you can also display the positions
on Google maps (this is done by clicking on the ![]() button in the table).
button in the table).
If you have checked the “Show” check box (or
the “Connect” and “Azimuths” check boxes) in the objects table, symbols marking
the positions (or connecting lines) will be shown on the map. Detailed
information on the positions (name, date, time, nearest station) will be
displayed if you have chosen to display these in the previous form.
4.5.3
Objects
The work with the Objects modules is done in
several steps, which is why this module contains many forms.
4.5.3.1
Tracked objects list
The displayed default form is the “Tracked
objects list” form. When you open the form, you will see a table containing all
objects of the currently logged in user, for which you have selected the
“Wagon” option. The table will contain as many items as you have selected in
the “Number of objects on page” combo box on the “Settings” page.
If you want to change the objects displayed in
the “Objects list” table, you only need to change the options selected in the
respective combo boxes. You can narrow down the set of found objects if you
fill in the “Find” text field and click on the Find button. The Find function will find you those objects that
have the entered text contained in their name. If no corresponding object is
found, you will see a notification saying “No data items.”
In the objects table you can see this button ![]() by each item. If you click on the button, you
can edit the selected object in the opened “Detail” form. This form is
identical with the one used for creating a new object, only it also contains
the Delete button. By clicking on
this button you remove the selected object. If the last position of the object
is known, you will see the
by each item. If you click on the button, you
can edit the selected object in the opened “Detail” form. This form is
identical with the one used for creating a new object, only it also contains
the Delete button. By clicking on
this button you remove the selected object. If the last position of the object
is known, you will see the ![]() button in the table. If you click on it, the
last known position of the object will be shown on the Google map.
button in the table. If you click on it, the
last known position of the object will be shown on the Google map.
The form contains two more buttons: Positions import and New object. If you click on these
buttons, corresponding forms will be opened (“Positions import from XML”,
“Detail”).
4.5.3.2 Tracking requirement
The “Tracking requirement” form is another form
you can work with in this module. To open the form you need to click on the
name of the selected object in the objects table (in the “Tracked objects list”
form). In this form you can select the mode of tracking for the selected
object.
In the upper part of the form you can see
following items (information about the object): “Name”, “Tracked object type”,
“Last position” (date, time, railway number, nearest station number and name). But
the information is displayed in the “Last position” item only if there is a
known last position of the object. If it is so, then you can also display the
last position of the object on a map by clicking on an appropriate button. The ![]() button allows you to display the position on
the JERID “blind” map and the
button allows you to display the position on
the JERID “blind” map and the ![]() button allows you to see the position on the
Google map.
button allows you to see the position on the
Google map.
In the lower part of the form you can find a
tree view containing three items: “External systems”, “Own tracking unit”,
“Manual position setting”. Each of these items stands for a mode of tracking. These
items also contain several controls, which allow you to set or define the
selected mode of tracking.
The item (tracking system), which was selected
for the object, will be seen as active in the opened form. Otherwise, it is the
“Manual position setting” item, which is active.
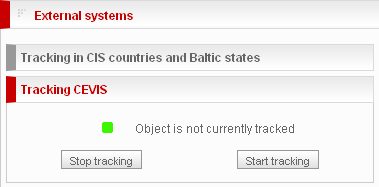
External systems – this item allows
you to select one of two modes of tracking. These modes are: Tracking with UZ
(Ukrainian Railways) and CEVIS Tracking.
Tracking in CIS
countries and
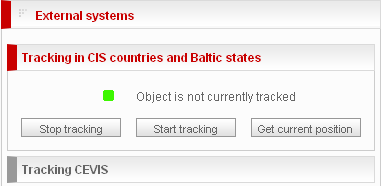
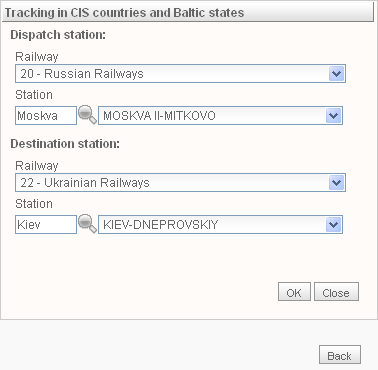
In the “Tracking with UZ” form you enter the
dispatch and destination station using the “Select and enter station” derived
control. To start the tracking you need to click on the OK button.
CEVIS Tracking – this tree view contains buttons and the “State of tracking” graphic
control as well. To activate the tracking you have to click on the Start tracking button. After you click
on it, you will see a notification saying “Action was successful.” To terminate
the tracking of the object you need to click on the Stop tracking button.
The Own tracking
unit item provides only one tracking mode – the
“Racapoun SMS”.
Tracking with
racapoun SMS – just like the two previous items this tree view also contains buttons
and the “State of tracking” graphic control. But moreover, there is the “Code”
text field, which you have to fill in before starting the tracking. If you do
not enter any code and still click on the Start
tracking button, you will see a notification saying “Racapoun code is
missing.” and the tracking will not be activated.
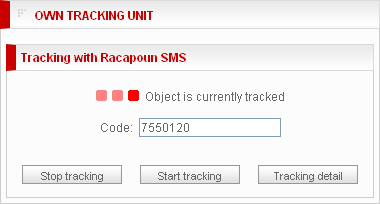
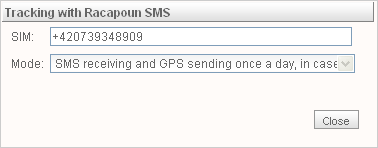
If you click on the Tracking detail button, you will open the “Tracking with Racapoun
SMS” form. The form contains two items: “SIM” and “Mode”, which only display
information. The Administrator only can change the settings of these items.
To terminate the tracking of the object you
need to click on the Stop tracking button.
After you click on it, you will see a notification saying “Action was
successful.”
Manual position setting – this item contains the Manual
position setting button, which opens the “Manual position setting” form.
If you want to create a new position, you have
to fill in the obligatory items, which are: “Date”, “Time”, “Coordinates”. You
can use the calendar to fill in the “Date” item. You select the type of
coordinates (GPS or WGS84) by clicking on the corresponding radio button. If
you need to enter any additional information, you can do so in the “Info” text
field.
By clicking on the OK button you save the created position. If you enter wrong or
non-existing coordinates and click on the OK
button, you will see a notification saying “Invalid coordinates.” and the
position will not be saved. If you do not enter any data in the “Date” and
“Time” items and click on the OK button,
you will see a notification saying “Invalid date and time” and the position
will not be saved either.
There are two ways how to enter coordinates:
you can either directly fill in the numbers into the appropriate text fields or
you can simply double click on the appropriate location on the map. If you
choose to double click on a location on the map, you will see a symbol of a
flag ![]() marking the selected position. Until you click
on the OK button, you can freely
change the position simply by dragging the flag icon anywhere else on the map.
marking the selected position. Until you click
on the OK button, you can freely
change the position simply by dragging the flag icon anywhere else on the map.
4.5.3.3 Tracked object detail
This form is used for creating a new object or
for editing an existing object. In this form you have to fill in the obligatory
items: “Name”, “Tracked object type” and “Picture”. From the “Picture” combo
box you select the symbol, which will be displayed by the object in tables and
on the map. Objects, for which you have checked the “Use attributes” check box,
will be displayed with a symbol for azimuth![]() .
After you have filled in all these items, you can click on the Save button.
.
After you have filled in all these items, you can click on the Save button.
After you click on the Save button, the system will check whether the “Name” item is
filled in and whether it is filled in correctly (if you have selected Wagon or
Container in the “Tracked object type” combo box), i.e. whether the wagon or
container number consists of the correct control number. If it is so, the
system will save the object.
If you do not enter any name of the object,
then, after you click on the Save button,
you will see a notification saying “Wrong number”. If you enter a wrong number,
then, after you click on the Save button,
you will see a notification saying “Wrong control number” (for wagons) or
“Wrong number” (for containers), or “Wrong length of number (8 or 12 digits)”.
The form also contains the “Description” text
field where you can enter any additional information about the object.
Furthermore, there is the “Use azimuths” checkbox. By checking or unchecking it
you select whether the “Azimuth” check box will be checked or unchecked in the
Objects table on the “History” page.
4.5.3.4 Import positions from XML
This form allows you to import positions from a
created XML file. By clicking on the Browse button
you open the “Load file” dialogue form. There you select the XML file. To start
the import of positions into the database you need to click on the Import button.
If the imported XML file format does not have
the appropriate structure, then, after you click on the Import button, you will see a notification saying “False input”. If
you do not select any file for import, then, after you click on the Import button, you will see a
notification saying “No file selected.”
The form also contains two links: “Example of XML
positions file” and “XML file scheme”. These links allow you to see an example
of a XML file or an example of a XML file scheme (a XSD file).
4.5.4
Settings
This page contains several items, which allow you to define the
settings. You can save the selected settings by clicking on the Save button.
4.6
Infrastructure
4.6.1
Show
Infrastructure will be displayed in accordance with the selected or
entered parameters. There are three combo boxes: “Railway”, “Traction” and
“Track class”. The form also contains two text fields: “Track number” and
“Number of rails”. If no track fulfils the selected or entered parameters,
then, after you click on the Show button, you will see a notification saying “No
tracks were found.”
Furthermore, the form contains radio buttons representing colours, which
will be used for highlighting the infrastructure. The “Set cut” check box
allows you to select whether the map cut should
be set so as all connecting lines are visible. Otherwise, the current map cut
will be shown.
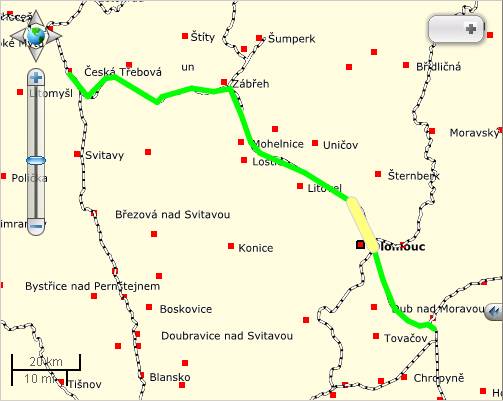
To display the infrastructure you have to click on the Show button. If you click on a track leg
on the map, the leg will be highlighted and at the same time the “Info” page
will become active (unless selected before). The “Info” page contains detailed
parameters of the track corresponding with the selected national railway.
4.6.2
Route
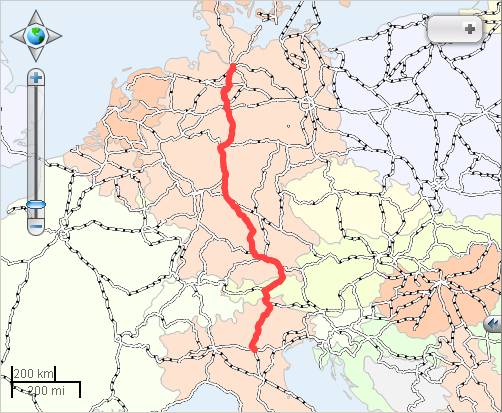
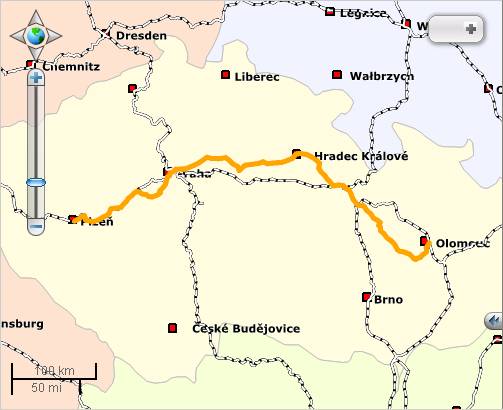
To display the shortest route between two railway stations on the map
(with the total length in km) you have to click on the Search button. But before you do so, you have to enter the dispatch
and destination station in the “Display/Hide route selection” form. Otherwise,
you will see a notification saying “Dispatch station is not entered”, or “Destination
station is not entered”. You select the stations using the “Select and enter
station” derived control. For further specification of the route you can also
select a “Via station” and “Traction” or enter “Number of rails” and “Axle
load”. The selection of the “Via” station is done in the same way as the
selection of all other stations: by means of the “Select and enter station”
derived control.
The page also contains the “Show/Hide forbidden infrastructure” tree
view. This form is used for defining the stations, tracks and track legs, which
should not be included in the shortest route.
There are two ways of defining the forbidden infrastructure. You can do
it either in the “Show/Hide forbidden infrastructure” form or on the “Info”
page. To select a station you can use the “Select and enter station” derived
control and to select a track or a track leg you can use combo boxes. The
options contained in the “Forbidden tracks” combo box are offered in accordance
with the selected railway and the options contained in the “Forbidden legs”
combo box are offered in accordance with the selected forbidden track. This
means that first you have to select a forbidden track and then you can select a
forbidden leg.
The track or leg that you select in the respective combo boxes will be
displayed on the map as well. But to add the track or leg to the forbidden
infrastructure list you have to click on the Add button. It is possible to further work with the lists. By
clicking on the ![]() button you can display the tracks or legs on
the map or you can remove them by clicking on the
button you can display the tracks or legs on
the map or you can remove them by clicking on the ![]() button.
button.
If you wish to display all forbidden tracks or legs, you can use the Display all forbidden legs button. This
is of course possible only if the forbidden infrastructure lists contain any
items. Otherwise, after you click on the Display
all forbidden legs button, you will see a notification saying “No tracks or
legs were forbidden”.
The “Route” page also contains the “Set cut” check box, which allows you
to define the setting of the map cut.
If, after you fill in the “Show/Hide route selection” and “Show/Hide
forbidden infrastructure” forms, the system finds no appropriate data, you will
see a notification saying “No tracks were found”.
4.6.3
Information
Apart from information about track parameters of the currently selected
track leg (the leg is selected on the “Show” and “Route” pages) this page
contains two buttons: Add leg among forbidden legs and
Add track among forbidden tracks. By clicking on the
buttons, you activate the corresponding functions, i.e. you add the selected
leg or track among forbidden infrastructure that can be found on the “Route”
page.
Once you click on either of the buttons, it becomes inaccessible. To use
the button again you have to select a new leg on the map. But if the selected
leg or track has already been added among the forbidden legs or tracks (either
on this page or on the “Route” page), the buttons will remain inaccessible,
i.e. it is not possible to add the same leg or track (already added leg or
track) among forbidden infrastructure again.
4.7
Corridors
4.7.1
Corridors
The “Corridor type” combo box allows you to select a corridor type. The
“Corridor” combo box allows you to select the particular corridor. Moreover,
the page contains radio buttons representing
different colours which will be used for highlighting the selected corridor. To
display the selected corridor you need to click on the Show corridor button.
After you click on the Show
corridor button, the selected corridor will be shown (highlighted in the
selected colour) on the map.